=== ACF Conditional Logic Advanced ===
Contributors: andrej.pavlovic
Tags: acf, advanced custom fields, acf-field, conditional logic
Requires at least: 3.6.0
Tested up to: 4.9.9
License: GPLv2
License URI: http://www.gnu.org/licenses/gpl-2.0.html

Adds an Advanced Conditional Logic field setting to ACF that can show/hide individual fields based on post template, format, and/or category.

= Links =
* [Website](https://github.com/andrejpavlovic/acf-conditional-logic-advanced)
* [Support](https://github.com/andrejpavlovic/acf-conditional-logic-advanced/issues)
* [Advanced Custom Fields](https://www.advancedcustomfields.com/)

== Screenshots ==

1. Post Category options
2. Advanced Conditional Logic field setting options: Template, Format, Category

== Changelog ==

= 1.1.3 =
* Small fix to prevent acf-input category check from throwing errors when editing menus

= 1.1.2 =
* Small fix for Yes/No when editing Field in Field Group
* Tested with ACF 5.7.7

= 1.1.1 =

* Don't display Conditional Logic Advanced row when field type is "Clone".

= 1.1.0 =
* Added support for custom taxonomies.
* Added support for non-hierarchical taxonomies. (e.g. Tags)
* Reorganized the Post Template dropdown options.

= 1.0.3 =
* composer.json - fixed version

= 1.0.2 =
* composer.json - fixed name

= 1.0.1 =
* Added composer.json

= 1.0.0 =
* Initial release.
This repository contains the implementation for a containerized Spring Cloud Task. The task generates reports by getting the relevant data from our MDM, compiling a PDF and uploading it to the MDM. Currently the task is started by the MDM via the AWS Fargate API and the MDM sends an E-Mail on task completion.
Developers
Developers need to have at least maven and docker on their machines. Currently you need to install java 15 sdk on your system. On Ubuntu you should use SDKMAN!.
The following environment variables have to be set for running the JUnit test:
MDM_ENDPOINT=https://dev.metadata.fdz.dzhw.eu
MDM_TASK_USER=taskuser
MDM_TASK_PASSWORD=**** (see s3://metadatamanagement-private/sensitive_variables.tf)
The docker image can be build with:
mvn -Pdev clean install
If you want to run the task against an MDM instance running on your local machine, you can run:
For further configuration options you should get familiar with Spring Boot @ConfigurationProperties and have a look into src/main/java/eu/dzhw/fdz/metadatamanagement/tasks/reporttask/config.
Template Editing
The latex files which are compiled within this task are generated with FreeMarker. The templates can be edited under /src/main/resources/template/. Changes to the latex styles and images can be made here:
/latex-packages/doc/
Continous Integration
Every commit to the branches development, test or master will be pushed to Amazon ECR. Github Actions are used for executing the build and pushing to AWS.
Issues
If you find any issues or have questions regarding this task, feel free to file an issue in our MDM.
This repository contains examples and notes for design patterns. It is aimed at helping developers understand, apply, and practice design patterns in real-world scenarios.
🚀 Features
Beginner-Friendly: Simple explanations for each pattern without unnecessary complexity.
Organized Structure: Patterns are categorized into Creational, Structural, and Behavioral groups.
Permet le contrôle d’une diode électroluminescente (DEL) pour Arduino. Outre son état, on peut la mettre en mode clignotant, ajuster le délai et modifier son intensité lumineuse. Son mode de fonctionnement est non-bloquant.
Il existe deux classes : DelPin.h pour une DEL branchée sur une broche, et Del.h, pour contrôler une DEL virtuelle où l’utilisateur aura la responsabilité de faire le contrôle matériel correspondant.
Notes de version
2.0.1 :
Uniformisation du pointeur de fonction pour toutes les plateformes.
2.0.0 :
Refonte pour que Del gère les comportements virtuels et que DelPin gère une Del matérielle.
Permet l’utilisation de la Del générique via une fonction de référence;
Permet l’utilisation des fonctions lambdas
Mise à jour de la gestion des PWMs sur la version 3 de ESP32-Arduino
Permettre le fonctionnement (PWM) sur la version antérieure 2 de ESP32-Arduino
Utilisation
Voici l’exemple simple avec une DEL branchée sur une broche.
Constructeur générique pour une DEL virtuelle, sans spécification matérielle. On peut aussi fournir une fonction qui aura la responsabilité de modifier matériellement la del; la fonction doit recevoir un float, qui correspond au pourcentage d’intensité voulu pour la
DelPin(int pin)
On spécifie le numéro de la broche sur lequel est branché la Del.
Méthodes disponibles
Méthodes de Del.h
voidrefresh()
Cette méthode doit être placée en début de boucle loop(): elle permet de mettre à jour l’état de la DEL sans bloquer l’exécution du reste de la boucle.
voidon()
void off()
Ces méthodes permettent respectivement d’allumer ou d’éteindre la del. Elles sont équivalentes à set(true) et set(false).
voidset(bool value)
bool get()
Permet de lire et modifier l’état de la del (allumée ou éteinte).
voidsetBlinking(bool value)
bool getBlinking()
Permet de lire et modifier le mode clignotement (activé ou non). Même si le mode clignotement est activé, cela n’allume pas pour autant la del.
voidsetBlinkingInterval(unsignedlong value)
unsigned long getBlinkingInterval()
Permet de lire et modifier le temps d’intervalle du clignotement, en millisecondes.
Permet de lire et modifier l’intensité lumineuse de la del, entre 0 et 100%. NOTE: Modifier l’intensité lumineuse supérieur à 0 ne va pas nécessairement allumer la DEL: il faut également faire appel à la méthode .on() ou .set(true).
voidsetSignalUpdater(SignalUpdater updater)
Permet de définir une fonction de mise à jour personnalisée pour la DEL. Cette fonction est appelée à chaque fois que la DEL est mise à jour. La fonction doit recevoir un float, qui correspond au pourcentage d’intensité voulu pour la del.
Méthodes de DelPin.h
voidbegin()
Initialise la DEL. Cette méthode doit être appelée dans la fonction setup().
intgetPinNumber()
Retourne le numéro de la broche sur laquelle la DEL est connectée.
intgetChannel()
Retourne le numéro du canal PWM utilisé (uniquement pour les anciennes versions d’ESP32).
intgetAddress()
Permet de lire le numéro de la broche utilisée lors de l’initialisation de l’objet pour la classe DelPin.
A tiny server app based on Node.js (Nest.js).
The app implements simple organization user structure management operations.
The following user roles are supported:
a. Administrator (top-most user, only he can change user roles);
b. Boss (any user with at least 1 subordinate);
c. Regular user (user without subordinates).
Each user except the Administrator must have a boss (strictly one).
The following REST API endpoints exposed:
Register user.
Authenticate as a user.
Return list of users, taking into account the following:
administrator can see everyone;
boss can see herself and all subordinates (recursively);
regular user can see only himself.
Change user’s boss (only boss can do that and only for his subordinates).
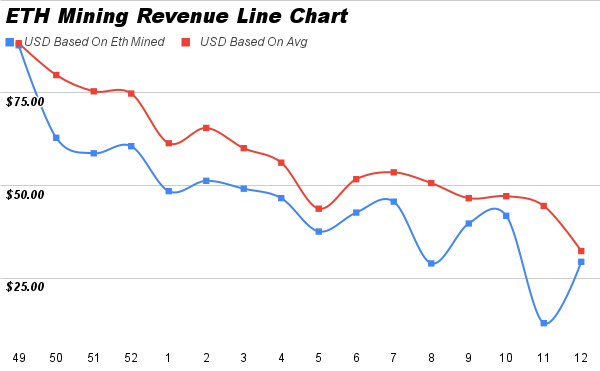
Personal Ethereum Mining Revenue Compared to Reported Average
Andrew Keyes
Bachelor of Arts in Experimental Psychology
Department of Psychology, California State University, Stanislaus
April 2022
Abstract
Study comparing the revenue of a personal Ethereum miner in US Dollars (USD) to the average rate of Ethereum mining revenue relative to megahash, over November 28th, 2021 to March 18, 2022. Average weekly Ethereum mining revenue rate in USD per megahash, weekly personal Ethereum revenue, and the price of 1 Ethereum was collected over 15 weeks to calculate average Ethereum mining revenue and personal mining revenue per week in USD. Results depict higher revenue in the average rate of Ethereum mining compared to the personal Ethereum miner relative to megahash.
Introduction
Ethereum (ETH) mining revenue is nothing new, yet still a practice new to so many. Blockchain technology provides operability of ETH’s network and has become a passion that I participate in through ETH mining. Revenue analysis of personal mining operations in comparison to the reported network average would reveal whether my machine outperformed the network in revenue relative to megahash. This study inspects the relationship of revenue in USD between the personal ETH miner and the reported ETH mining average.
ETH is a cryptocurrency, currently operating under a Proof of Work (PoW) mechanism governed by the algorithm Ethash. PoW is a decentralized consensus protocol, in which miners: do the work- direct validation within the ETH ecosystem and provide proof of their work. ETH miners provide a “certificate of legitimacy” for transactions, balances, and market orders. The miner “independently agglomerates a set of valid transactions into a block and attempts to solve a predefined cryptographic puzzle as PoW, which involves data from the block and a specific prior block. The first miner to solve the problem broadcasts his solution to the network, and by virtue of the solution, is able to add the block to the ever-growing blockchain as a child of the prior block.” (Bissias et al., 2019)
Anyone is capable of mining with a computer, internet connection, electricity, and money for graphic processing units (GPUs). Users can use this capacity for revenue to create profits through proper management of hashrate, electric rate, and power consumption.
Hashrate is primarily dependent on the hardware used. Hashrate defines the miner’s performance rate, the higher the more revenue. “Based on the number of shares a miner submits over a specific time period, the miner’s hash rate can be derived. Hash rate refers to the number of unique attempted PoW solutions generated over a period of time” (Knottenbelt et al., 2018). A specific hashrate may earn less as more miners come online, and new components outdo prior models. This change is termed an ‘increase in network difficulty’, in turn reducing mining revenue.
Electricity is a priority when computing profitability but disappears when it comes to revenue. It’s possible to earn revenue without profit, if the electric bill is larger than ETH payouts, you are paying more than you are earning. It’s important to compute electric rate and consumption when considering profit. The present study is concerned with revenue, not profitability, so electric consumption will not be considered.
Many operating systems allow ETH mining, including Windows. While other operating systems are designed specifically for Proof of Work, like Hive OS. Miners are rewarded through participation, if a new block is solved/ created, two ETH are minted to the miner. Due to intense difficulty to participate in the worldwide network as a solo miner, most miners opt towards joining a mining pool (group mining). Countless pools exist, as well as payment methods to distribute among participating miners. Before having a pool to mine with mining software is required. Various options are widespread furthering decentralization in the network including Phoenix Miner, NBMiner, and GMiner.
Revenue is acquired through block rewards and transaction fees. A block in ETH is a batch of transactions which allows for validation of dozens of transactions to be synchronized at once. Blocks contain a reference to its parent block, and all are chained together to the first genesis block. “Block time refers to the time it takes to mine a new block. In Ethereum, the average block time is between 12 to 14 seconds and is evaluated after each block.” (Smith, 2022)
Understanding the relationship between personal ETH mining revenue and the reported ETH mining revenue average can help answer individual questions and concerns regarding mining’s value. For example, how average revenue trends relate to personal profits relative to hashrate, discover inefficient mining practices, and develop a deeper understanding of ETH mining difficulty to profitability. To fulfill the performance of a full-time miner, one must truly become a full-time miner. Meaning not taking away mining time from the machines. As a college student extraneous variables enter the situation making providing that of a full-time miner becomes distant. I hypothesize personal ETH miner revenue will perform lower overall in comparison to reported average ETH mining revenue.
Methods
Materials
Around 170 megahash is reached by the personal ETH miner. Which consists of 4 GPU’s: 2x Nvidia GeoForce RTX 2080 8gb, and 2x Nvidia Geforce RTX 3060Ti LHR. Internet access is gained through a wired connection into a wireless router extender. The miner uses Hive OS to operationalize the machine, Nbminer as the miner, and Ethermine for the pool.
Hive OS is a computer operating system optimized for mining of cryptocurrencies. Nbminer, one of many miners, provides extra efficiency for LHR cards making it an understandable miner option. Ethermine, the mining pool within this study, offers a PPLNS payout scheme, “Pay-Per-Last-N-Shares”. When a block is found the reward of each miner is calculated based on the participation to the last number of pool shares. Ethermine provides instant payouts as soon as the threshold of 0.005 ETH is met.
BitInfoChart aggregates a historical chart of ETH’s mining profitability in USD per day for one megahash. Multiple timelines are available with daily data points from 3-months to 3-years to even all-time (7/30/15).
Procedures
15 weeks of personal mining revenue was gathered from November 28th, 2021 (Week 48, 2021) to March 18, 2022 (Week 12, 2022) with a mining rig averaging 170 megahash through Ethermine. Data was grouped weekly Sunday-Saturday, with the United States Dollar (USD) price of 1 ETH listed for the corresponding week. Revenue in ETH was multiplied with the price of 1 ETH each week to create a weekly estimate of personal miner revenue in USD.
Reported average daily mining revenue collected on BitInfoChart was transformed into weekly revenue averages in USD per 1 megahash. To create an estimate of reported average mining revenue in USD relative to the hashrate output of the personal miner, weekly avg USD per 1 megahash was multiplied with 170.
Results
A conducted on SPSS comparing personal mining revenue in USD (M= 46.51, SD= 16.81, N= 16) and reported average revenue in USD (M= 58.23, SD= 15.12, N= 16) revealed a significant difference in revenue; t(15)= 6.1, p = .001. Results fail to reject the hypothesis; Personal ETH miner revenue will perform lower overall in comparison to reported average ETH mining revenue. Proving the personal miner is under performing based on the average reported revenue.
Visual analysis depicts clear discrepancies each week in ETH mining revenue between personal and reported rates. The initial revenue found in the first week, week 49 2021, is the closest the two values are throughout the whole study, a 0.58 cent difference. The line chart displays the downward trend of ETH mining revenue over the course of the study. Based on visual analysis, revenue is lower, and drops are more significant in personal mining than in the reported average.
Discussion
Findings revealed the expected hypothesis to be true, personal ETH miner revenue will be lower overall in comparison to the reported average ETH mining revenue. Revenue from mining is multifactorial, hardware could crash, electricity could be cut off, or internet connection could be lost.
Lower revenue in personal mining can be linked to an unstable mining operation. Hive OS, the operating system used for my miner is known to randomly crash forcing a mandatory physical reset. Which could leave the miner not working for hours, increasing down-time rather than ETH. Additional crashes occur when rebooting the wifi router to clear cache and speed connection. This happens often and randomly, forfeiting away a lot of potential participation. Since the personal miner is also a workstation it’s necessary to turn off the miner when there’s tasks to complete. Graphic designing, video editing, report writing, and researching take precedence over mining ETH. Additionally, playing video games for a couple hours a week takes away from operational mining time. Low overclock settings may have influenced the decrease in revenue as well. These settings are set low for hardware safety and longevity, which may negatively affect returns. Crypto’s volatility could have played a big role, if the personal miner amassed a large amount of down time while the market was booming, a lot of potential revenue could have been lost.
Results imply personal operations could be more efficient in terms of ETH mining in various measures. Whether it be up-time or hashrate, it is clear that there is still room to grow. This has shown how much potential revenue I have missed out on due to not maintaining a stable participation rate throughout the study.
Cryptocurrency mining revenue is hot in the media and in the rooms they operate. Many will go to the greatest extent to receive maximum revenue. In the comparison of personal miner revenue and the reported ETH revenue rate, a distinction is made clear of those who maximize their ability to reap revenue mining ETH and those who don’t.
References
Bissias, G., Levine, B. N., Ozisik, A. P. (2019). Estimation of Miner Hash Rates and Consensus on Blockchains. Cornell University, Computer Science. https://doi.org/10.48550/arXiv.1707.00082
Knottenbelt, W. J., Pritz, P. J., Werner, S. M., Zamyatin, A. (2019). Uncle Traps: Harvesting Rewards in a Queue-based Ethereum Mining Pool. VALUETOOLS 2019: 12th EAI International Conference on Performance Evaluation Methodologies and Tools, 127–134. https://doi.org/10.1145/3306309.3306328
Demo: Ionic tabs + global pages with ion-back-button
Ionic 4 project with a tab based layout and workarounds for the ion-back-button.
The demo shows two ways how to navigate from a tabbed page to a ‘global’ page and back, without losing tab-states.
Getting Started
git clone https://github.com/servrox/demo-ionic-tabs-back-button.git
cd demo-ionic-tabs-back-button
yarn
ionic serve
Solutions shown in demo
First solution is a workaround that overcomes the problem.
The second one is a fix which deals directly with the problem by using ion-back-button-tabs a custom ionic 4 component.
1. Passing previous page (s. global-page-one)
This solution overcomes the problem by using an ion-button instead of the ion-back button.
To make it work following steps are necessary:
Get the route you want to navigate back later.
this.currentRoute = btoa(this.router.url);
Pass that value to the page called. (url params used here)
<ion-button
    [routerLink]="['/global-page-one', {p: currentRoute}]"
    routerDirection="forward">
    Global Page One
</ion-button>
When navigating from a page inside a tab to a ‘global’ page,
the ion-back button will no longer work properly.
More specifically, the back button no longer navigates to the previously opened page, instead it uses the redirect of the tabs-routing. This happens because the ion-back-buttonuses only the main-IonRouterOutlet, instead of also checking tabs-IonRouterOutlet.
Which means that the StackController inside the main-IonRouterOutlet only knows the route of the tabs module (e.g. ‘tabs’).
^No guarantee on this^ Problem is also described in the official Bug Report.
A library to handle currencies and money. Targeted at blockchain and cross-chain applications.
About
Building systems with money is pretty hard. Especially when the monetary amounts that the application has to deal with uses different decimal representations, has numerous accounting units, and the same currency exists on multiple chains.
To tackle these issues, this library serves as a common interface to deal with monetary amounts in a safe and predictable way.
Objectives
The overall goal of this library is two-fold:
Provide a secure currency interface. This includes safe arithmetic, type checking to ensure conversions between currencies are done correctly, and correct rounding.
Provide a universal currency interface. The interface should be able to have an identifiable name and ticker, and an “origin”.
Specification
We provide a light-weight specification to establish a common set of rules for the monetary library. Please check the specification for more details.
References
A good portion of this specification was inspired by this excellent post on safe-money.
There is also a great library for fiat currencies called dinero.js based on this post.
Library
Getting started
Install from npmjs:
npm i @interlay/monetary-js
Or
yarn add @interlay/monetary-js
Usage
Assuming that the library already provides the currencies you require, you can readily use them as indicated below.
You may also add your own currencies without having to make an upstream contribution as explained in the defining your own currencies section.
importBigfrom"big.js";import{Bitcoin,Ethereum,BitcoinAmount,EthereumAmount,ExchangeRate}from"@interlay/monetary-js";constbitcoins=newBitcoinAmount(0.5);constethers=newEthereumAmount(newBig(1).mul(10).pow(-9));// one gweiconstsameEthers=newEthereumAmount("1e-9");// also one gwei// conversions to string and Big of different unitsconsole.log(`We have ${bitcoins.toString()} BTC, and ${ethers.toString()} ethers.`);constweiBig: Big=ethers.toBig(0);// value in atomic units (ETH * 10^-18 aka. wei)constgweiBig: Big=ethers.toBig(9);// value in gwei (wei * 10^9)constalsoEthBig: Big=ethers.toBig(18);// value in eth (wei * 10^18)constethBig: Big=ethers.toBig();// value in eth (no parameter => assumes "natural" denomination)constsatoshiString: string=bitcoins.toString(true);// value as string in atomic units (satoshi)constbtcString: string=bitcoins.toString();// value as string in "natural" units (btc)// converting between different currenciesconstETHBTCRate=newExchangeRate<Ethereum,Bitcoin>(Ethereum,Bitcoin,newBig(0.0598));// for ETH/BTC, "base" is ETH, "counter" is BTCconstbitcoinsAsEthers: EthereumAmount=ETHBTCRate.toBase(bitcoins);// type-safe arithmeticconsttotalEthers=ethers.add(bitcoinsAsEthers);// ethers.add(bitcoins); // error
Defining your own currencies
Monetary-js comes with Bitcoin, Ethereum and Polkadot predefined, but it is meant to be extensible for any currency. src/currencies/bitcoin.ts can be used as an example for the minimal work needed to define a currency. Another example is DummyCurrency defined inline for unit tests in test/monetary.test.ts
The first step is to define our currency, parametrising the type with decimals.
For a MonetaryAmount, the internal representation will be stored with a 10 to the power of decimals shift of the Currency. Rounding, default behaviors for toString() and toBig() will represent the amounts at that precision.
For example, when using an amount of 0.5 Bitcoin, the internal representation is represented as 0.5 * 10^8 (50,000,000 Satoshi)
and all operations (.add(...), .sub(...), etc.) will use the internal representation.
humanDecimals is used for pretty-printing approximate (truncated) stringified values using toHuman().
git clone https://github.com/interlay/monetary.git
cd monetary
yarn install
Build:
yarn build
And run tests:
yarn test
Contributing
Contributions are what make the open source community such an amazing place to be learn, inspire, and create. Any contributions you make are greatly appreciated. Our basic contributing guidelines are found in this repository.
Fork the project
Create your feature branch (git checkout -b feat/AmazingFeature)
Sign and commit your changes (git commit -S -m 'feat: Add some AmazingFeature')
Push to the branch (git push origin feat/AmazingFeature)
Open a pull request
If you are searching for a place to start or would like to discuss features, reach out to us on the #development channel: