Blog

  • FinDL_Fintech_DeepLearning

    Transformers for Sentiment Analysis on Financial Text

    Fine-tuned Models based on pretrained Hugging Face Transformers

    Usage

    From Command Line

    # this will install necessary packages
    pip install -r requirements.txt
    
    # this will run the whole pipeline consists of downloading full dataset, generate data, 
    # downloading our finetuned models from google drive, unzip model folders,
    # predict sentiments on testing dataset
    
    python run.py generate_data download_models test
    
    # trainning process based on pretrained models from HuggingFace
    python run.py generate_data train test
    
    # for predict based on tweets data from twitter API
    python run.py download_models predict
    
    # for default testing run (submission for Quater1), 
    # test run will download, unzip our finetuned models from google drive,
    # predict on dummy testdata(3 samples) and output predicted labels
    
    python run.py testing

    File structure and configuration

    All configuration will be read from config folder, data-params.yml will be read when generating data, model_config.yml will be read when downloading, unzipping finetuned models, train-params.yml will be read as training hyperparameters as well as io path, test-params.yml consists io for test dataset and testrun dummy dataset.

    Raw dataset will be scraped from data sources and saved in data/raw, processed data will be saved in data/temp predictions will be saved in data/out, all datafiles will be saved in .csv file.

    Finetuned models, no matter directly output from training process, or download from google shared drive, all will be saved in results folder train.py will download pretrained models from Hugging Face hub, and read data from data/temp, finally save finetuned model to result folder.

    test.py will take two argument, test_target and test_lines. test_target can be specified as testing, which will generate prediction on testing data
    or default as test to predict on testrun dummy data. All prediction will be saved in data/out.

    FinTech Project                      //
    ├─ config                            //
    │  ├─ config.json                    //
    │  ├─ data-params.yml                //
    │  ├─ model-config.yml               //
    │  ├─ test-params.yml                //
    │  └─ train-params.yml               //
    ├─ data                                                            //
    │  ├─ kaggle.json                                                  //
    │  ├─ out                                                          //
    │  │  ├─ model.joblib                                              //
    │  │  └─ preds.csv                                                 //
    │  ├─ raw                                                          //
    │  ├─ temp                                                         //
    │  │  ├─ test.csv                                                  //
    │  │  └─ train.csv                                                 //
    ├─ myapp.log                                                       //
    ├─ README.md                                                       //
    ├─ run.py                                                          //
    ├─ spacy                                                           //
    │  ├─ .DS_Store                                                    //
    │  └─ create_model.py                                              //
    ├─ reports                           //
    │  ├─ abstract.md                    //
    │  ├─ demo.md                        //
    │  ├─ discussion.md                  //
    │  ├─ figures                        //
    │  │  └─ logo_png.png                //
    │  ├─ intro.md                       //
    │  ├─ introduction.md                //
    │  ├─ methods.md                     //
    │  ├─ requirements_jb.txt            //
    │  ├─ results.md                     //
    │  ├─ _config.yml                    //
    │  └─ _toc.yml                       //
    ├─ src                                                             //
    │  ├─ data                                                         //
    │  │  └─ make_dataset.py                                           //
    │  ├─ test.py                                                      //
    │  ├─ train.py                                                     //
    │  ├─ utils                                                        //
    │  │     └─ download_models.py                                     //
    ├─ submission.json                                                 //
    ├─ test                                                            //
    │  └─ testdata                                                     //
    │     └─ test.csv                                                  //
    ├─ twitter                                                         //
    │  ├─ pull_tweets.py                                               //
    │  └─ twitter_credentials.py                                       //
    ├─ _requirements.txt                                               //
    └─ _run.py                                                         //
    

    Visit original content creator repository
    https://github.com/crvander/FinDL_Fintech_DeepLearning

  • enigmacurry.com

    EnigmaCurry.com

    This is the source for my website at enigmacurry.com.

    Feel free to copy (I do.), but make it your own.

    Architecture

    • Nuxt.js – A Vue.js static
      website builder. This does everything I ever wanted
      blogofile (my old blog engine) to
      do, and more. Moving to Javascript makes sense to me, given the huge
      advantage of web browser ubiquity and function.
    • Three.js – A full abstration of
      WebGL in Javascript.
    • vue-threejs – This was the most well
      developed set of Vue.js components for Three.js that I found. I have heavily
      modified this base and included it in
      components/geometry
    • See the LICENSE for a full list of credits.

    Components

    • GRenderer – A single GRenderer takes up the full width and height of the window, and persists across all pages.
    • GScene – Mounts into the GRenderer per page.
    • components/scenes – Collection of scenes.
    • pages/geometry – The pages that contain scenes.
    • assets/shaders – GLSL shaders and
      nunjucks templated shaders.
    • plugins – nuxt.js plugins that become availalble to every
      component (this.$pluginname), reusable geometry functions live in here.

    Build Setup

    # install dependencies
    $ yarn install
    
    # serve with hot reload at localhost:3000
    $ yarn run dev
    
    # build for production and launch server
    $ yarn run build
    $ yarn start
    
    # generate static project
    $ yarn run generate

    For detailed explanation on how things work, checkout Nuxt.js
    docs
    .

    Visit original content creator repository
    https://github.com/EnigmaCurry/enigmacurry.com

  • livewire-dashboard

    Create Dashboard

    Using this package you can create beautiful dashboards.

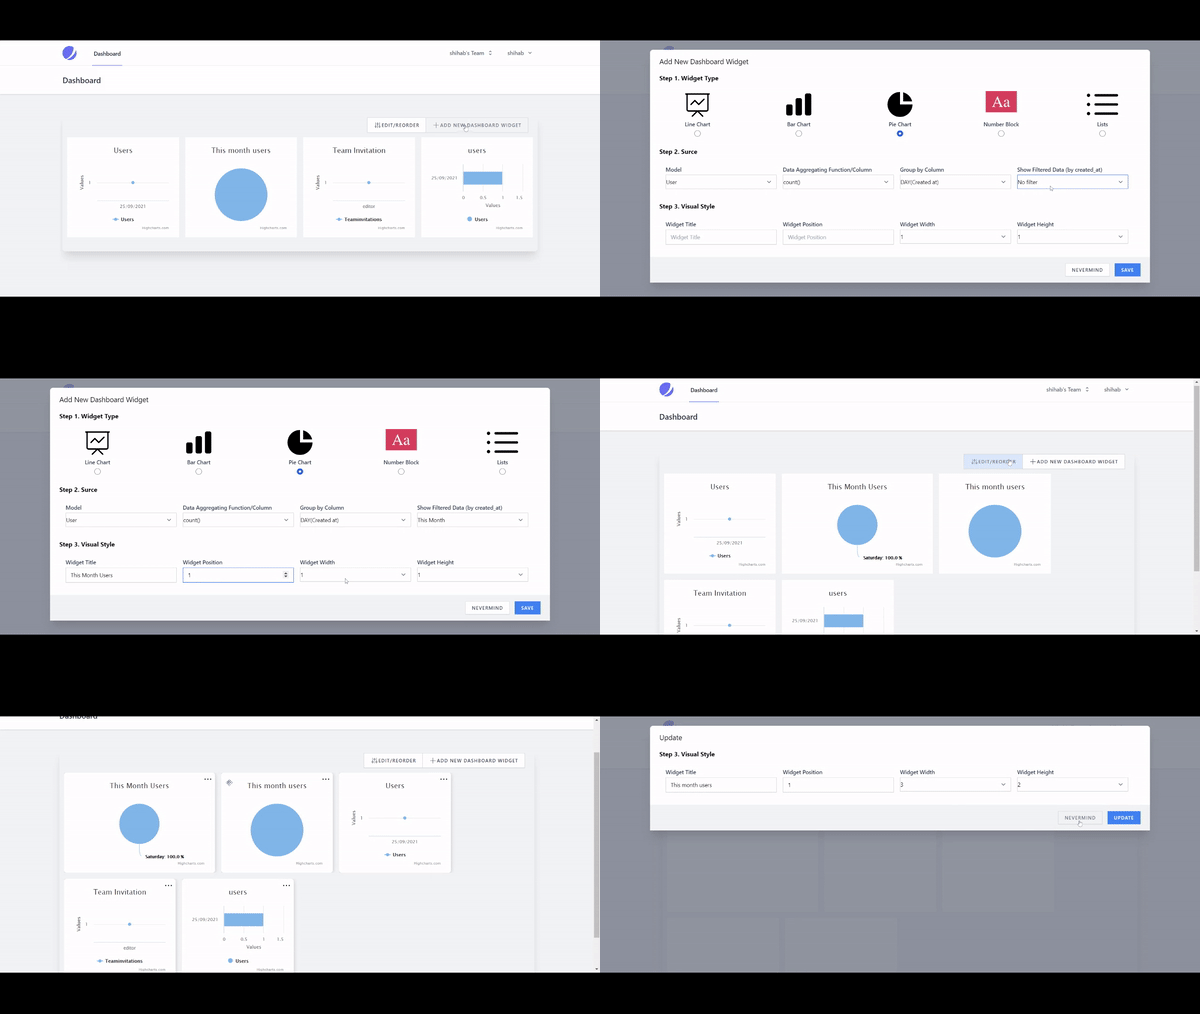
    screenshot

    Requirements

    Installation

    You can install the package via composer:

    composer require shihabphp/livewire-dashboard

    Publish the migrations

    To create the dashboard_tiles table, you must create and run the migration.

    php artisan vendor:publish --provider="Shihabphp\Dashboard\DashboardServiceProvider" --tag="dashboard-migrations"
    
    php artisan migrate

    Creating your dashboard

    In your Laravel app, create a new route and view. The url and view name can be whatever you want.

    Route::view('dashboard-url', 'dashboard-blade-view');

    In your Blade view, use the dashboard Blade view component.

     <livewire:livewire-dashboard />

    Customizing the views

    If you want to customize the view used to render the dashboard and the tiles, run this command:

    php artisan vendor:publish --provider="Shihabphp\Dashboard\DashboardServiceProvider" --tag="dashboard-views"

    Testing

    composer test

    Changelog

    Please see CHANGELOG for more information on what has changed recently.

    Contributing

    Please see CONTRIBUTING for details.

    Security

    If you discover any security related issues, please email shihab640@hotmail.com instead of using the issue tracker.

    Credits

    License

    The MIT License (MIT). Please see License File for more information. ‘

    Credits and Influences

    Visit original content creator repository https://github.com/shihabphp/livewire-dashboard
  • Redmi_Note_12S_Assets

    [29/03/2025]: CRITICAL EMERGENCY CHANGES!!!!!!!

    With HyperOS 2 finally released for the Xiaomi Redmi Note 12S Global, there are some important things that have changed.

    The version of Android with HyperOS 2 has changed from Android 14 to Android 15.

    What’s up with this? The most important thing, the boot.img, has changed, and not only that, the OrangeFox that was for this device, no longer works (or at least it did in my case).

    Currently, as I write this, there is no public way to get the boot.img of HyperOS 2 for the Redmi Note 12S, since at best you will get the ROM version in recovery, which does not contain the file we need.

    And if you make the mistake I did, flashing a boot.img from the previous version of HyperOS, which was based on Android 14, you will be in a beautiful bootloop.

    I come here updating this repository almost a year later, delivering the only working custom recovery, TWRP, and a boot.img extracted from version OS2.0.2.0.VHZMIXM.

    I have extracted the boot.img using payload-dumper-go.

    Go to the Assets folder and download the boot.img and the twrp_sea.img.

    Thank you Trock for helping me with the problem I had at the beginning with my device, I was desperate hehe…

    What is this? (OLD README, DO NOT READ)

    this repository containing the original boot.img of the latest HyperOS version (OS1.0.6.0.UHZMIXM) of the Xiaomi Redmi Note 12S (Global). and the OtrangeFox and TWRP usable (?) for this same phone.

    Boot Image from: https://xiaomifirmwareupdater.com/hyperos/sea/stable/OS1.0.6.0.UHZMIXM/

    OrangeFox Image from: https://github.com/shazu-xd/releases/releases/download/vofox/OrangeFox-R12.1_1-Stable-sea.img (The page not exist..)

    This repository, I don’t think I will update it constantly.

    Also, I am not a contribution of the Xioami community or this specific phone, I just want to facilitate how to do certain steps from my own experience.

    And as I am not the owner of the recoveries, possibly with HyperOS updates, or another problem, they will stop working and I will not do anything to fix that.

    if you have any suggestions for this repository, I am happy to see them and take them into account if they are really worth it :3

    This is my first repository made for the public, probably there are some mistakes, sorry hehe…

    How to flash OrangeFox on Redmi Note 12S:

    I AM NOT RESPONSIBLE FOR ANY DAMAGE THAT MAY RESULT FROM THIS PROCEDURE EVEN IF IT IS APPLIED ON THE SAME DEVICE.

    IF FOR SOME REASON YOU GET STUCK IN A BOOTLOOP AFTER FLASHING THE orangeFox.img, GO BACK TO FASTBOOT AND FLASH THE bootOriginal.img.

    Of course, you must already have the bootloader unlocked on your phone, and have the necessary drivers in your PC to recognize it in Fastboot mode, right? ok.

    (All the images that you will see in this section, were taken by me, even the recovery images.)

    Download orangeFox.img from this repository, and also bootOriginal.img

    Why download the bootOriginal.img? because we need it after flashing the recovery, put that file to the SD of your phone, preferably in a specific folder for your convenience.

    Enter FastBoot mode

    using Platform Tools, open a terminal inside that folder, enter this command (HEY, THIS WILL OVERWRITE YOUR BOOT.IMG ON YOUR PHONE):

    fastboot flash boot theRecoveryImage.img

    If you receive this:

    Perfect, the flash is completed! Your phone will reboot, if not, use this:

    fastboot reboot

    After the reboot, you are already in OrangeFox recovery!

    but… you don’t have access to your HyperOS, because we have overwritten the boot partition, here, OrangeFox being in the boot partition, is a bit unstable, be quick but think about your actions!

    if you take too long, the recovery will crash, and the phone will reboot, here the steps:

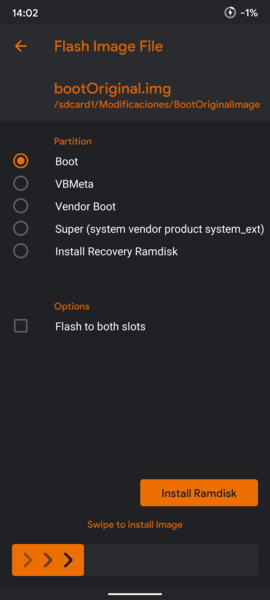
    Find the bootOriginal.img that you saved on your SD, and flash that bootOriginal.img to your boot partition:

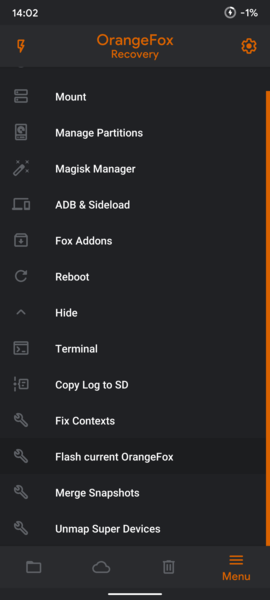
    BUT, DON’T RESET, you should still be in OrangeFox recovery, which is loaded in your memory. In the bottom bar, go to the last option, [Menu]

    you should see an option called Flash current OrangeFox, go to that option and use it:

    it will flash the OrangeFox you have in memory, in the original boot partition of your Redmi Note 12S. Now you can reboot and get back to your HyperOS.

    Visit original content creator repository https://github.com/Slushi-Github/Redmi_Note_12S_Assets
  • GradientOverlayExample

    GradientOverlayExample

    If you want to place gradient view over your another view (UILabel e.g.) you can try the codes provided in ViewController viewDidLoad method.

    let gradientView = UIView(frame: CGRect(x: 0, y: self.textLabel.frame.maxY - 100, width: 375, height: 100))
    self.view.addSubview(gradientView)
    let gradientLayer: CAGradientLayer = CAGradientLayer()
    gradientLayer.frame = gradientView.bounds
    // colors of your overlay. [0] - start color, [1] - end color
    gradientLayer.colors = [UIColor(white: 1, alpha: 0.95).cgColor, UIColor(white: 1, alpha: 0.6).cgColor]
    gradientLayer.startPoint = CGPoint(x: 0, y: 0)
    gradientLayer.endPoint = CGPoint(x: 0, y: 1)
    gradientView.layer.addSublayer(gradientLayer)
    // rotate view 180 degrees
    gradientView.transform = CGAffineTransform(rotationAngle: CGFloat.pi)

    gradient up-down:

    gradientLayer.startPoint = CGPoint(x: 0, y: 0)
    gradientLayer.endPoint = CGPoint(x: 0, y: 1)

    gradient down-up:

    gradientLayer.startPoint = CGPoint(x: 0, y: 1)
    gradientLayer.endPoint = CGPoint(x: 0, y: 0)

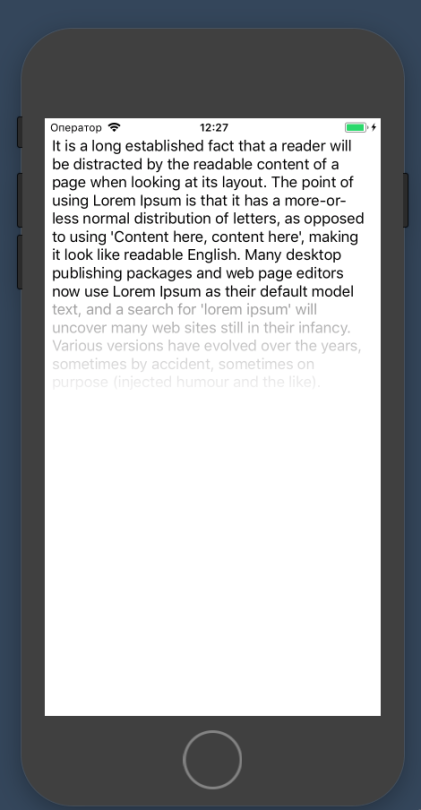
    see the result below:

    Visit original content creator repository https://github.com/SergeyPetrachkov/GradientOverlayExample
  • rancher-ui-driver-linode

    rancher-ui-driver-linode

    Rancher UI driver for the Linode docker-machine driver

    Usage

    Manual installation is not required in Rancher v2.2.0+ as the Linode Node Driver is included.

    See the following guide for notes on installing Rancher and configuring the Linode Node Driver.

    Advanced usage is also discussed, including integration with Linode Kubernetes Addons:

    Docker Machine Driver Linode

    The Linode Docker Machine Driver that this Node Driver uses is described here:

    Setup

    These steps are still useful in Rancher v2.0.x where the Linode Node Driver is not already included.

    • Add a Machine Driver in Rancher 2.0.x (Global -> Node Drivers)

      • Name: Linode

      • Download URL:

        https://github.com/linode/docker-machine-driver-linode/releases/download/v0.1.7/docker-machine-driver-linode_linux-amd64.zip

      • Custom UI URL (Note: v0.3.0-alpha.1 and greater require Rancher 2.2.3+ ):

        https://linode.github.io/rancher-ui-driver-linode/releases/v0.2.0/component.js

      • Checksum

        faaf1d7d53b55a369baeeb0855b069921a36131868fe3641eb595ac1ff4cf16f

      • Whitelist Domains:

        linode.github.io

    • Wait for the driver to become “Active”

    • Go to Clusters -> Add Cluster, the driver and custom UI should show up.

    Development

    This package contains a small web-server that will serve up the custom driver UI at http://localhost:3000/component.js. You can run this while developing and point the Rancher settings there.

    • npm start
    • The driver name can be optionally overridden: npm start -- --name=linode
    • The compiled files are viewable at http://localhost:3000.
    • Note: The development server does not currently automatically restart when files are changed.
    • Do not use the model.linodeConfig signature to access your driver config in the template file, use the config alias that is already setup in the component

    Building

    For other users to see your driver, you need to build it and host the output on a server accessible from their browsers.

    • npm run build
    • Copy the contents of the dist directory onto a webserver.
      • If your Rancher is configured to use HA or SSL, the server must also be available via HTTPS.

    Contribution Guidelines

    Would you like to improve the rancher-ui-driver-linode module? Please start here.

    Resources

    Announcements and Documentation

    Join us on Slack

    For general help or discussion, join the Kubernetes Slack channel #linode.

    Visit original content creator repository
    https://github.com/linode/rancher-ui-driver-linode

  • ocaml-for-web-programming

    Ocaml for web programming

    This repository aims to reference existing web programming tools, frameworks and
    libraries in OCaml. There are also a list of todo.

    Bindings

    Javascript libraries/frameworks

    • Standard library
      Binding to the javascript standard library

    • JQuery
      Jquery provides some objects and methods to improve the DOM manipulation and
      event handling.

    • Nodejs
      Instead of using javascript only in a web browser, Nodejs allows you to use
      javascript on your system by providing a javascript interpreter running on
      top of Google V8 javascript engine
      Nodejs has lots of module which give you the possibility to run, for
      example, an http server.

    • D3
      D3.js is a JavaScript library for manipulating documents based on data. D3
      helps you bring data to life using HTML, SVG, and CSS. D3’s emphasis on web
      standards gives you the full capabilities of modern browsers without tying
      yourself to a proprietary framework, combining powerful visualization
      components and a data-driven approach to DOM manipulation.

      • Binding in js_of_ocaml: ocaml-d3 (can be
        installed with opam install d3)
    • extjs

    • reactjs

    • electron

    • Google Maps

    Mobile development

    • Cordova plugins
      Cordova allows you to develop hybrid mobile applications using web technologies. Through plugins, you can access to devices components.

    Running OCaml program in browsers

    OCaml to javascript compilers:

    Tools to simplify bindings:

    Pure OCaml web frameworks/libraries

    Typed HTML/CSS

    • Ocsigen Tyxml: Library to build statically correct Html and Svg

    Server and client side

    • Ocsigen Eliom:

      • Server side page generation (and continuation based Web programming)
      • Language extension for client-server Web application in OCaml
      • Session manipulation
      • Reactive Web pages
      • Mobile applications in OCaml with Apache Cordova
    • Ocsigen Toolkit: Native OCaml widgets for client or client-server Web applications

    Web servers

    • Ocsigen Server: Modular Web server (using cohttp or its own http library) with https, access control, authentication, user configuration files, reverse proxy, CGI scripts, etc.

    Client side

    Mobile development

    • Ocsigen Eliom:

      • Server side page generation (and continuation based Web programming)
      • Language extension for client-server Web application in OCaml
      • Session manipulation
      • Reactive Web pages
      • Mobile applications in OCaml with Apache Cordova
    • Ocsigen Eliom base app: High level library and application template with user management, notifications, mobile app (work in progress)

    To-do

    Typescript/Javascript

    • Typescript aims to develop a typed javascript. DefinitelyTyped contains a lot of bindings to popular javascript libraries. It would be useful to have a compiler OCaml to typescript and use this repository as reference.

    • Bindings to popular javascript frameworks

      • Angularjs
      • Backbone.js
      • Ember.js
      • JQueryUI
      • Babylon
      • Karma
      • Phantom JS
    • Bindings to node packages. Can be interesting to have a website such as the official website for node packages (here) with the bindings.

    HTML/CSS

    • Think about typed CSS with OCaml.

    • Create typed bindings to CSS frameworks such as bootstrap, MaterializeCSS.

    • Functions to create style HTML elements such as buttons, containers, rows, etc using popular CSS libraries –> Simplify HTML5 pages builds. We can imagine to have a module for each popular CSS libraries. For example, we can have with bootstrap

    module B = Bootstrap_css
    B.create_container (B.create_row (B.create_col 4 ~lg:3 ~md:6 ~xs:12))

    giving as output

    <div class="container">
      <div class="row">
        <div class="col-lg-3 col-md-6 col-xs-12"></div>
        <div class="col-lg-3 col-md-6 col-xs-12"></div>
        <div class="col-lg-3 col-md-6 col-xs-12"></div>
        <div class="col-lg-3 col-md-6 col-xs-12"></div>
      </div>
    </div>

    Use Tyxml ?

    Hybrid mobile programming

    • Ionic allows to develop hybrid mobile applications with a native apparence using web technologies. There are ionic plugins written in Javascript (different than cordova plugins).

    • NativeScript: build truly mobile applications
      with web technologies.

    Tools

    • Integration with popular text editors/IDE.

    • A package manager such as npm.

    • Task runners such as Gulp/Grunt

    Visit original content creator repository
    https://github.com/dannywillems/ocaml-for-web-programming

  • symulacja-glebi-ostrosci

    Projekt nr 37

    Symulator głębi ostrości

    Autorzy: Piotr Harmuszkiewicz, Kamil Szczepanek, Tomasz Gajda

    1. Opis Projektu

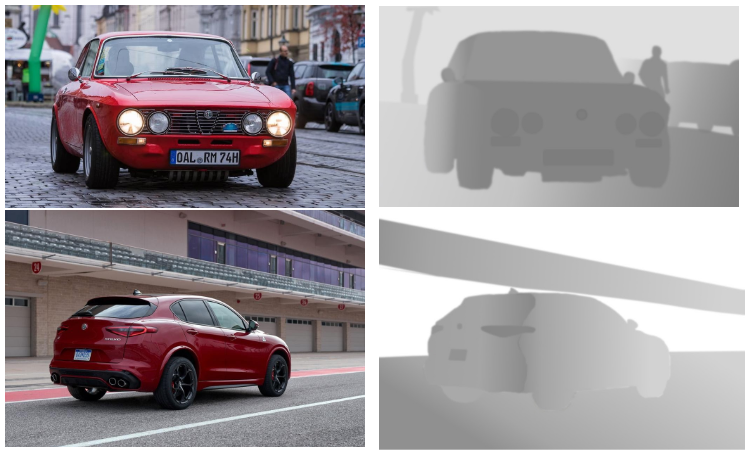
    Projekt zakłada stworzenie programu, pozwalającego na symulowanie głębi ostrości. Oznacza to, że jeśli ustawimy ostrość na obiekt znajdujący się trzy metry od “obiektywu” to obiekty bliższe oraz dalsze będą rozmyte – ma symulować działanie rzeczywistych obiektywów. Efekt ten wykorzystywany głównie przez branżę kreatywną, często stosowany jest w celu skupienia uwagi widza na jakimś obiekcie – wskazania co na zdjęciu jest najważniejsze. W celu symulacji głębi, skorzystać będziemy musieli z tzw. map głębokości – są to obrazy o nieskończonej głębi ostrości specjalnie przygotowane dla danych obrazów.

    2. Założenia wstępne przyjęte w realizacji projektu

    Program powinien pozwolić użytkownikowi na ustawienie parametrów mapy głębokości jakimi są ogniskowa obiektywu i przysłona. W każdej chwili mamy opcję resetowania naszych ustawień mapy poprzez kliknięcie przycisku. Możemy również porównać nasze zdjęcie z mapą głębokości ze zdjęciem oryginalnym. Możliwe ma być też wczytywanie zdjęć z pliku oraz zapisywanie ich do pliku. Praca nad projektem miała potrwać miesiąc. Uzgodniliśmy wygląd interfejsu.

    alt text

    Rys. 1 Zdjęcia wraz z przygotowanymi mapami głębokości

    3. Analiza projektu

    Specyfikacja interfejsu użytkownika

    Interfejs powstał przy użyciu programu wxFormBuilder.

    alt text

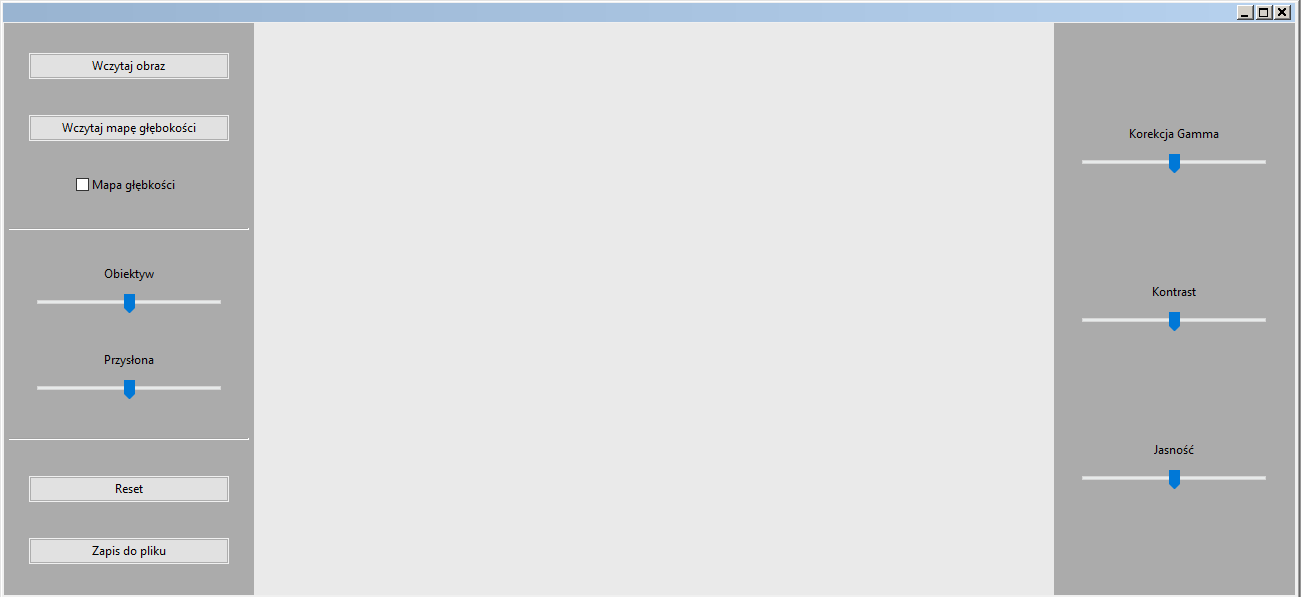
    Rys. 2 Interfejs programu

    Składa się on z 4 przycisków, 1 checkboxa oraz 5 sliderów.
    Przyciski służą głównie do kontroli nad plikami:

    • Wczytaj obraz – Przycisk pozwala na otwarcie okna dialogowego i wczytanie wybranego przez nas pliku do programu jako zdjęcie główne
    • Wczytaj mapę głębokości – Przycisk pozwala na otwarcie okna dialogowego i wczytanie wybranego przez nas pliku do programu jako mapę głębokości
    • Reset – Przycisk pozwala na zresetowanie ustawień zmienionych na sliderach obsługujących mapę głębokości
    • Zapis do pliku – Przycisk pozwala na zapisanie naszego zmodyfikowanego zdjęcia do pliku

    Checkbox daje nam możliwość decydowania o tym czy chcemy nałożyć mapę głębokości na obraz czy też chcemy widzieć oryginał.

    Slidery służą do kontrolowania zmian efektów nałożonych na obraz. Znajdujące się po lewej stronie służą do kontroli związanej ściśle z symulacją głębi ostrości:

    • Obiektyw – Pozwala nam zmieniać wartość ogniskowej obiektywu, decyduje “na jakiej głębokości” zdjęcie zacznie się rozmazywać
    • Przysłona – Pozwala nam obsługiwać przysłonę, decyduje jak bardzo będzie rozmazywać się zdjęcie pod wpływem mapy głębokości

    Te znajdujące się prawej natomiast, służą do wprowadzania innych, niezwiązanych z symulacją poprawek wizualnych:

    • Korekcja Gamma – Pozwala nam zmieniać wartość korekcji gamma
    • Kontrast – Pozwala nam zmieniać wartość kontrastu na naszym zdjęciu
    • Jasność – Pozwala nam zmieniać jasność naszego zdjęcia

    Decyzja o wyborze narzędzi programistycznych

    Zadecydowaliśmy, że program zostanie stworzony z wykorzystaniem biblioteki WxWidgets, ponieważ jest ona wspierana przez pomocny i wygodny przy budowaniu interfejsów program wxFormBuilder.
    Wszyscy korzystaliśmy z Visual Studio 2019 jako że poprzez wykonywanie laboratoriów przez pierwszą połowę semestru wszyscy nabraliśmy doświadczenia z tym środowiskiem i mieliśmy je już poprawnie skonfigurowane do współpracy z biblioteką WxWidgets.

    Do przechowywania okresowych postępów korzystaliśmy z platformy GitHub, na której stworzyliśmy repozytorium gdzie przesyłaliśmy rzeczy, które aktualnie robiliśmy. Było to bardzo wydajne rozwiązanie, które nie powodowało żadnych problemów, a wszyscy członkowie grupy mieli najnowsze wersje programu cały czas w pełni dostępne.

    4. Opracowanie i opis niezbędnych algorytmów

    Liczyliśmy średni kolor wokół każdego pixela, w obszarze zależnym od odległości. Im pixel na mapie głębokości dalej, tym większy obszar z którego liczymy średnią (pixel ten, przyjmuje kolor średniej). W jaki sposób to uzyskaliśmy?
    Mamy nasz obraz – każdy pixel ma 3 parametry: r, g, b typu unsigned char czyli 1 bajt (0-255)

    1. Liczymy summed area table:
      (tj. tablica sum prefiksowych lub tablica zsumowanego obszaru). Jest to tablica w której każdy kolejny element jest sumą poprzednich, czyli dla tablicy 1D:

    t[0] = 2, t[1] = 4, t[2] = 8, t[3] = 13, t[4] = 17, t[5] = 20

    Summed area table (SAT) będzie wyglądała następująco:

                SAT[0] = t[0] = 2,0 
    
    
                SAT[1] = t[0] + t[1] = 6, 
    
    
                SAT[2] = t[0] + t[1] + t[2] = SAT[1] + t[2] = 14 
    
    
                SAT[3] = SAT[2] + t[3] = 27 
    
    
                SAT[4] = Sat[3] + t[4] 
    

    Co nam to daje? – W ten sposób możemy szybko policzyć sumę elementów od t[a] do t[b], wystarczy odjąć t[b] – t[a] i mamy sumę od a do b. A jak mamy sumę to mamy też średnią:

    t[b] – t[a] / (b-a)

    Jednak nasz obraz jest 2D – wszystko działa bardzo podobnie: do policzenia SAT najpierw zsumujemy wiersze a potem kolumny (w rzeczywistości jednak nie ma znaczenia co najpierw zsumujemy – wiersze czy kolumny).

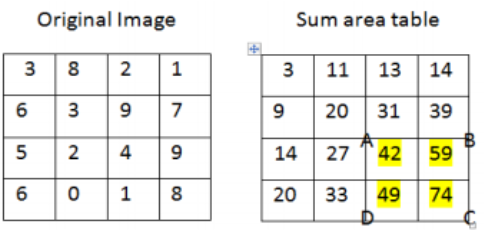
    Otrzymujemy tablice SAT 2D i chcemy obliczyć sume obszaru a potem średnią:

    alt text

    Suma obszaru ABCD będzie wynosić: sum = C + A – B – D
    4 + 9 + 1 + 8 = 22 = 20 + 74 – 33 – 39

    a średnia to sum / ((B – A) * (D – A))

    W ten sposób liczymy średnią dla każdego pixela. Pamiętamy, że pixel ma 3 wartości (r, g, b) i każdy element tablicy to tak naprawdę 3 liczby (wartości w SAT na końcu tablicy będą bardzo duże więc SAT jest typu unsigned int).

    2. GŁÓWNA PĘTLA FOR dla każdego pixela (i , j):

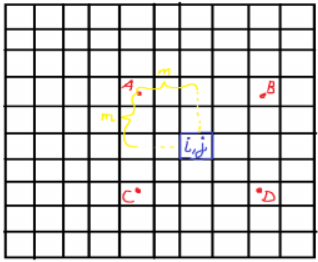
    a) Liczymy promień filtra (w programie float r) ten promień to tak naprawdę kwadrat, r tworzy kwadrat o boku 2r i środku w naszym pixelu (i,j) z tego kwadratu będziemy liczyć średnią

    alt text

    r = |(depthMap[i][j] – focus) / 255 * max|

    gdzie:

    focus – odległość w której obraz jest ostry (w zakresie 0-255)

    max – maksymalna wielkość r (im większe tym obraz szybciej/bardziej się rozmazuje w odległości)

    b) Liczymy sumę obszaru ABCD, a potem średnią:

                    A = SAT[i - m][j - m] 
    
    
                    B = SAT[i + m][j - m] 
    
    
                    C = SAT[i - m][j + m] 
    
    
                    D = SAT[i + m][j + m] 
    
    
                    sum = A - B - C + D 
    
    
                    średnia = sum/(2*m)<sup>2</sup> 
    

    kolorem naszego pixela będzie ta średnia – tak samo postępujemy dla każdego pixela.

    5. Kodowanie

    Klasy:

    • MyApp jest to klasa aplikacji, która jest konieczna by uruchomić nasz program, dziedziczy po klasie wxApp z biblioteki wxWidgets i nadpisuje dwie funkcje OnInit() oraz OnExit(), które po włączeniu programu tworzą nowy obiekt klasy SimGOSymulatorGO, a po wyłączeniu zwracają zero.

    • GUI to klasa stworzona i wygenerowana przez program wxFormBuilder. Znaleźć tam możemy wszystkie elementy interfejsu, czyli przyciski, suwaki oraz panel.

    • SimGOSymulatorGO jest to klasa zawierająca wszystkie metody obsługujące elementy interfejsu – metody które włączamy w razie korzystania z przycisków/slider’ów.

    • DOF jest to klasa odpowiadająca za działanie samej symulacji, zawiera zmienne i metody potrzebne do poprawnego funkcjonowania programu.

    Zmienne:

    • zmienne posiadające w nazwie Height opisują wysokość poszczególnych elementów
    • zmienne posiadające w nazwie Width opisują szerokość poszczególnych elementów
    • translationX oraz translationY opisują przesunięcie zdjęcia względem punktu (0,0) na panelu, pozwala na wycentrowanie wczytanego zdjęcia
    • depthMapOn to zmienna typu bool, która mówi nam o tym czy jest włączone nakładanie mapy głębokości
    • mainImage oraz depthMap to obiekty klasy wxImage, przechowujące oryginalne obrazki, odpowiednio obrazek główny oraz jego mapę głębokości
    • mainScaledImage oraz depthScaledMap to obiekty klasy wxImage, przechowujące przeskalowane obrazki, odpowiednio obrazek główny oraz jego mapę głębokości
    • original, depth, blurred, final to obiekty klasy wxImage opisujące poszczególne elementy składające się na otrzymanie zdjęcia objętego symulacją
    • (***SAT) – trójwymiarowa tablica SAT z opisanego wcześniej algorytmu
    • sizeX – szerokość oryginalnego zdjęcia
    • sizeY – wysokość oryginalnego zdjęcia
    • focal_distance – ogniskowa, odległość w jakiej należy ustawić obiekt, aby był ostry
    • focal_depth – głębia ogniskowa, szybkość z jaką obiekty przestają być ostre wraz z oddalaniem się od ogniskowej
    • max_focal_depth – maksymalna głębia ostrości

    Funkcje:

    • loadImage( wxCommandEvent& event ) – funkcja pozwalająca na wczytanie głównego zdjęcia
    • loadDepthMap( wxCommandEvent& event ) – funkcja pozwalająca na wczytanie mapy głębokości
    • mapOn( wxCommandEvent& event ) – funkcja obsługująca checkBox, od którego zależy czy włączona jest mapa głębokości
    • lensOnScroll( wxScrollEvent& event ) – funkcja obsługująca slider ustalający wartość zmiennej focal_distance
    • apertureOnScroll( wxScrollEvent& event ) – funkcja obsługująca slider ustalający wartość zmiennej focal_depth
    • resetImage( wxCommandEvent& event ) – funkcja pozwalająca użytkownikowi na reset obrazka do domyślnych wartości ustawień programu
    • saveImage( wxCommandEvent& event ) – funkcja pozwalająca na zapis obrazka do pliku
    • windowResized( wxSizeEvent& event ) – funkcja aktualizująca obrazek w momencie zmiany rozmiaru programu
    • updateUI( wxUpdateUIEvent& event ) – funkcja aktualizująca obrazek
    • gammaCorrection( wxScrollEvent& event ) – slider pozwalający na korzystanie z korekcji gamma na obrazku
    • setContrast( wxScrollEvent& event ) – slider pozwalający na korzystanie ze zmiany kontrastu obrazka
    • setBrightness( wxScrollEvent& event ) – slider pozwalający na korzystanie ze zmiany jasności obrazka
    • Repaint() – funkcja “rysująca” zdjęcie na panelu, wykorzystywana w każdej funkcji aktualizującej
    • calculate_SAT_DOF() – przelicza SAT a potem wywoluje calculateDOF()
    • calculateDOF() – aktualizuje obraz final (ale nie przelicza SAT)
    • allocateSAT(unsigned int x, unsigned int y) – zajmuje miejsce dla tablicy SAT
    • freeSAT() – zwalnia miejsce zajmowane przez tablicę SAT
    • calculateSAT() – funkcja obliczająca tablicę SAT opisaną w algorytmie
    • gettery, settery – seria funkcji pozwalających na dostęp do zmiennych prywatnych klasy DOF

    6. Wdrożenie, raport i wnioski

    Udało nam się spełnić wszystkie wymagania podstawowe – program wczytuje dwa pliki, obraz oraz mapę głębokości. Użytkownik ma możliwość wyboru parametrów odległości ostrej jak i wyboru jak mocno obraz ma się rozmywać. Obraz jest wyświetlany na ekranie i jest możliwe zapisanie obrazu na dysk. Udało nam się zrobić również część wymagań rozszerzonych – użytkownik może manipulować wartościami korekcji gamma, kontrastem czy też jasnością. Stworzyliśmy również dwie mapy głębokości które służą jako przykłady działania programu. Niestety różne manipulacje nie mogą być stosowane jednocześnie, co zdecydowanie jest główną rzeczą, którą należałoby poprawić.

    Visit original content creator repository https://github.com/nerooc/symulacja-glebi-ostrosci
  • LimitOrderBook.jl

    LimitOrderBook

    CI GitHub issues GitHub forks GitHub license

    About

    LimitOrderBook.jl is a limit order book (LOB) matching engine written in Julia, intended to be used for back-testing and simulation. The package implements a price-time priority LOB using an AVL Tree based implementations in line with the implementations proposed by Jenq & Jenq, 2018 and He et al., 2017.

    At this time, the package is lightweight and only includes relatively basic matching functionality, though additional features may be added in the future. The package does not yet include any speed benchmarks, though it should allow around 1-5 million inserts per second on average depending on the hardware.

    The package is still a work in progress and may still have some bugs.

    Documentation

    The OrderBook object is a data structure containing Orders. The package includes the functions submit_limit_order!, cancel_order! and submit_market_order! to insert and remove orders, as well as book_depth_info, volume_bid_ask, best_bid_ask, n_orders_bid_askand get_acct to return order book statistics and information. The utility function write_csv writes the entire book to an IO stream in csv format to save its state. The package also includes printing facilities to display the book status in the console. See the documentation, example and tests for more details.

    Installation

    Pkg.add(url="https://github.com/p-casgrain/LimitOrderBook.jl")

    Examples

    A simple example is provided below.

        using LimitOrderBook
        MyLOBType = OrderBook{Int64,Float32,Int64,Int64} # define LOB type
        ob = MyLOBType() # initialize order book
    
        # fill book with random limit orders
        randspread() = ceil(-0.05*log(rand()),digits=2)
        rand_side() = rand([BUY_ORDER,SELL_ORDER])
        for i=1:1000
            # add some limit orders
            submit_limit_order!(ob,2i,BUY_ORDER,99.0-randspread(),rand(5:5:20))
            submit_limit_order!(ob,3i,SELL_ORDER,99.0+randspread(),rand(5:5:20))
            if (rand() < 0.1) # and some market orders
                submit_market_order!(ob,rand_side(),rand(10:25:150))
            end
        end
    
        submit_limit_order!(ob,111,SELL_ORDER,99.05,10) # submit an order
        cancel_order!(ob,111,SELL_ORDER,99.05) # now cancel it
    
        ob # show state of the book
    Visit original content creator repository https://github.com/p-casgrain/LimitOrderBook.jl