SCRU128: Sortable, Clock and Random number-based Unique identifier
SCRU128 ID is yet another attempt to supersede UUID for the users who need
decentralized, globally unique time-ordered identifiers. SCRU128 is inspired by
ULID and KSUID and has the following features:
128-bit unsigned integer type
Sortable by generation time (as integer and as text)
scru128.h does not provide a concrete implementation of scru128_generate(),
so users have to implement it to enable high-level generator APIs (if necessary)
by integrating the low-level generator primitives provided by the library with
the real-time clock and random number generator available in the system. Here is
a quick example for the BSD-like systems:
#include"scru128.h"#include<stdlib.h>// or <bsd/stdlib.h> on Linux with libbsd#include<time.h>intscru128_generate(Scru128Generator*g, uint8_t*id_out) {
structtimespectp;
interr=clock_gettime(CLOCK_REALTIME, &tp);
if (err) {
returnSCRU128_GENERATOR_STATUS_ERROR;
}
uint64_ttimestamp= (uint64_t)tp.tv_sec*1000+tp.tv_nsec / 1000000;
returnscru128_generate_or_reset_core(g, id_out, timestamp, &arc4random,
10000);
}
Run make init inside .../ConfigurableMakefile/examples/Native project to initialize the folder structure.
Do the same inside .../ConfigurableMakefile/examples/Native project/deps/Ext1 and .../ConfigurableMakefile/examples/Native project/deps/Ext2, these are separate library projects and dependencies of “Native project” example.
Run make deps inside .../ConfigurableMakefile/examples/Native project to “make” the dependencies.
And finally run make to “make” the example project.
In .../ConfigurableMakefile/examples/AVR project/Makefile edit the variables: MCU, F_CPU, UPLOADER, PROGRAMMER, PORT…
Run make init inside .../ConfigurableMakefile/examples/AVR project to initialize the folder structure.
Run make to “make” the example project
And finally run make program to upload it to an AVR target.
Configuring the Makefile
See the instructions inside Makefile.
Commands
Run make help.
License
The MIT License (MIT)
Copyright (c) 2019 Vasil Kalchev
Permission is hereby granted, free of charge, to any person obtaining a copy
of this software and associated documentation files (the “Software”), to deal
in the Software without restriction, including without limitation the rights
to use, copy, modify, merge, publish, distribute, sublicense, and/or sell
copies of the Software, and to permit persons to whom the Software is
furnished to do so, subject to the following conditions:
The above copyright notice and this permission notice shall be included in all
copies or substantial portions of the Software.
THE SOFTWARE IS PROVIDED “AS IS”, WITHOUT WARRANTY OF ANY KIND, EXPRESS OR
IMPLIED, INCLUDING BUT NOT LIMITED TO THE WARRANTIES OF MERCHANTABILITY,
FITNESS FOR A PARTICULAR PURPOSE AND NONINFRINGEMENT. IN NO EVENT SHALL THE
AUTHORS OR COPYRIGHT HOLDERS BE LIABLE FOR ANY CLAIM, DAMAGES OR OTHER
LIABILITY, WHETHER IN AN ACTION OF CONTRACT, TORT OR OTHERWISE, ARISING FROM,
OUT OF OR IN CONNECTION WITH THE SOFTWARE OR THE USE OR OTHER DEALINGS IN THE
SOFTWARE.
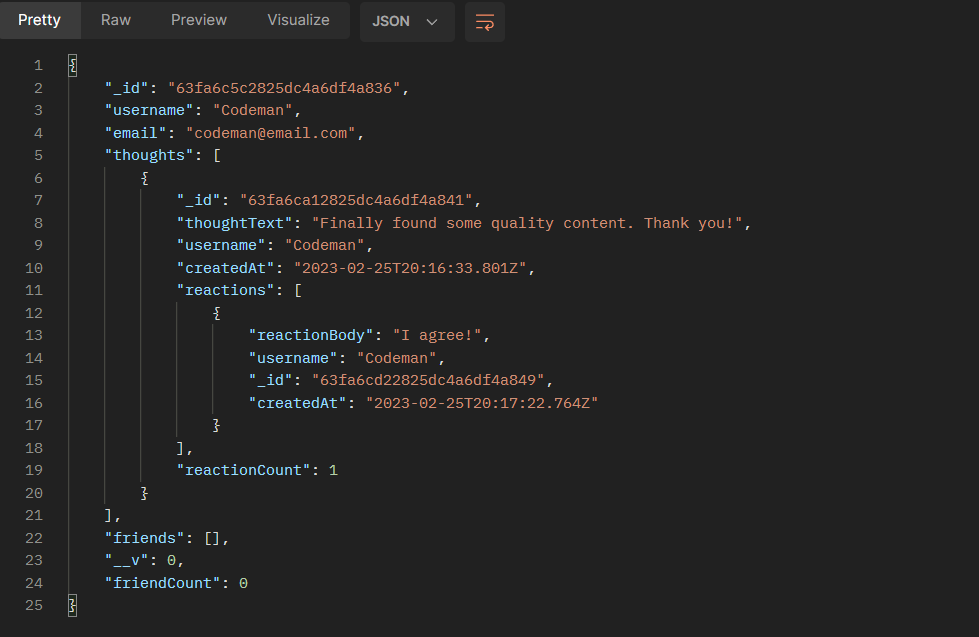
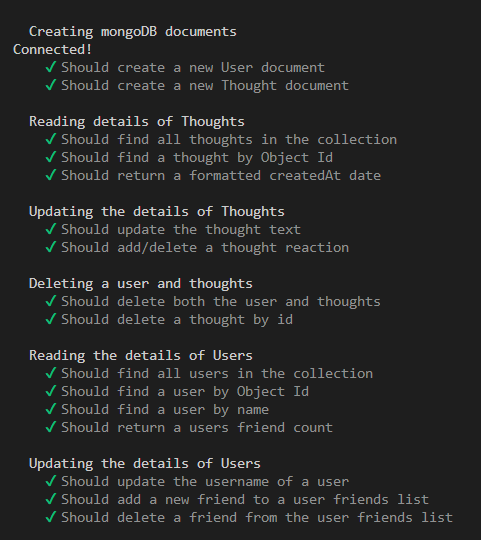
RESTful API for a social network web application where users can share their thoughts, react to friends’ thoughts, and create a friend list. This project was built using Express, MongoDB, and Mongoose. Also tested using Mocha and seeded using Postman. The API is designed to be scalable and flexible, allowing for easy integration with other applications.
Install the required dependencies by navigating to the project directory and running the following command:
npm install
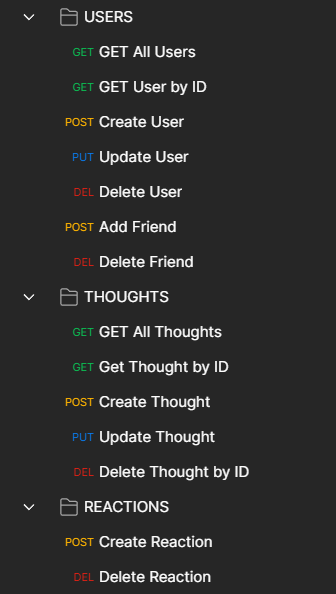
Features
All endpoints adhere to the principles of RESTful architecture and use standard HTTP methods (POST, GET, PUT, DELETE) to perform the respective actions. The API returns responses in JSON format, making it easy to parse and integrate into different applications.
User Management
Create, update, and delete new or exisiting users.
Friend Management
Add or remove friends from an exisiting user’s friend’s list.
Thought Management
Create, update, and delete thoughts for individual users.
Reaction Management
Create and delete reactions to individual user thoughts.
Usage
To use this RESTful API, you must have MongoDB and Node.js installed on your local machine. You will also need an API testing tool such as Insomnia or Postman. Be sure to follow the installation guidelines before proceeding. Once installation is complete, follow these steps to access the features.
Create a .env file to store your local MongoDB database credentials. Make sure your URL looks like the following:
This custom integration for Home Assistant allows users to generate and manage One-Time Passwords (OTPs) for Nuki Smart Locks directly from Home Assistant.
Features
Generate OTP codes with a specified lifetime.
Automatically delete expired or used OTPs.
Display current active OTP codes and their expiry times.
Integrate with Nuki Smart Lock API to manage access.
Installation
HACS Installation
If you have HACS installed, you can easily add this repository as a custom integration:
Open HACS in the Home Assistant frontend.
Navigate to “Integrations” section.
Click on the “…” button in the top right corner and select “Custom repositories”.
Add the URL of this repository.
Choose “Integration” as the category and click “Add”.
You should now be able to search for and install the Nuki OTP integration directly through HACS.
Manual Installation
To manually install this integration, follow these steps:
Ensure you have a Home Assistant instance running.
Download this repository and copy the custom_components/nuki_otp folder to the custom_components directory of your Home Assistant installation.
Restart Home Assistant to detect the new integration.
Configuration
After installation, add the integration through the Home Assistant frontend:
Navigate to Configuration -> Integrations.
Click on the + Add Integration button.
Search for Nuki OTP and select it.
Enter the required configuration details:
API Token
API URL
OTP Username
Nuki Name
OTP Lifetime Hours
Usage
Once configured, the integration will provide a sensor and a switch within Home Assistant:
Sensor: Displays the currently active OTP and its expiry time.
Switch: Allows generating a new OTP or deleting the current one.
Troubleshooting
If you encounter any issues, check the Home Assistant logs for errors and ensure your configuration details are correct. If problems persist, please report them on the GitHub repository.
Contributing
Contributions to this project are welcome! Feel free to fork the repository and submit pull requests.
License
This integration is released under the MIT License.
Disclaimer
This integration is not officially affiliated with Nuki and is provided “as is” without warranty of any kind.
A super lightweight Python script to display the current UTC date and time in a transparent, draggable window on your Windows desktop. Designed for simplicity and portability, this tool is perfect for anyone who needs a quick, unobtrusive UTC clock.
Features
Real-time UTC updates: Accurate to the second.
Transparent background: Blends seamlessly into your desktop.
Draggable and resizable: Fully customizable positioning and size.
Lightweight and simple: No unnecessary clutter—just the time.
Screenshot
Prerequisites
Python 3.x: Ensure Python is installed on your system. Download Python
tkinter: Pre-installed with most Python distributions. Verify by running:
Font size and style: Adjust the font parameter in the label setup:
font=("Helvetica", 20)
Transparency: Modify the -alpha value (0.0 to 1.0) for desired opacity.
Window positioning: Change x_position and y_position for different alignments.
Compatibility
This script is designed for Windows environments. While it may work on other operating systems (e.g., Linux or macOS), the transparent background and some UI behaviors are specific to Windows and might not function as expected elsewhere.
🕐 Include additional time zones for the global nomads.
🚀 Build a one-click installer for effortless setup.
Contribution
Contributions are welcome and strongly encouraged (I’d love upgrade contributions)! If you have suggestions, find issues, or would like to collaborate, feel free to:
Submit a pull request.
Open an issue.
License
This project is licensed under the MIT License. You are free to use, modify, and distribute this software as long as proper attribution is given.
⭐ Please Star
If you like this project, please ⭐ star it to show your support and help others discover it!
Support Me
If this little thing-a-ma-bob brought joy or utility to your digital life, consider supporting my work!
Your encouragement helps keep the caffeine flowing and ideas growing.
This Python script simulates the operation of an Enigma machine, a type of encryption device used by the Germans during World War II. The script allows the user to input the settings for the rotors, reflector, and plugboard (appairages), and then it simulates the operation of the machine based on these settings.
Usage
Run the script. You will be prompted to enter the settings for the rotors, reflector, and plugboard.
Input the rotors as ‘Y-X’ where Y is the rotor number and X is the value. You need to input three rotors. For example: 1-1 3-2 5-6.
Input the plugboard settings (appairages) as ‘A-C’. You can input up to 10 pairs. For example: A-B C-D E-F G-H I-J K-L M-N O-P Q-R S-T.
Input the reflector as a single letter: A, B, or C.
If the input is valid, the script will continue to the main function. If the input is invalid, the script will print “Invalid Input” and exit.
Example
Input rotors comme ça 'Y-X' Avec Y le rotor et X la valeure (*3) et les appairages comme ça 'A-C' (*10) et le reflecteur : A ou B ou C
Espace = clear et Entrée = quitter
Rotors: 1-1 3-2 5-6
[1, 1, 3, 2, 5, 6]
appairage: A-B C-D E-F G-H I-J K-L M-N O-P Q-R S-T
['A', 'B', 'C', 'D', 'E', 'F', 'G', 'H', 'I', 'J', 'K', 'L', 'M', 'N', 'O', 'P', 'Q', 'R', 'S', 'T']
Reflecteur: B
B
Note
This script is a simulation and does not provide real encryption. It is intended for educational purposes only.
If the content sparked 🔥 your interest, please consider buying the course and start learning 📖.
Insert certificate here when completed
Note: The material provided in this repository is only for helping those who may get stuck at any point of time in the course. It is very advised that no one should just copy the solutions(violation of Honor Code) presented here.
Progress/Curriculum.
Section 01 – Section 1: NEW – Spring Boot 3 Quick Start.
Contains my own notes with some course material to enforce learning experience.
This repository is made with with Eclipse hotkeys, therefore it will include configuration files which are related to this IDE this approach will be favored for now. ⚙️
If the content sparked 🔥 your interest, please consider buying the course and start learning 📖.
Note: The material provided in this repository is only for helping those who may get stuck at any point of time in the course. It is very advised that no one should just copy the solutions(violation of Honor Code) presented here.
If the content sparked 🔥 your interest, please consider buying the course and start learning 📖.
Insert certificate here when completed
Note: The material provided in this repository is only for helping those who may get stuck at any point of time in the course. It is very advised that no one should just copy the solutions(violation of Honor Code) presented here.
Currently transferring handwritten notes to digital form.
If the content sparked 🔥 your interest, please consider buying the course and start learning 📖.
Note: The material provided in this repository is only for helping those who may get stuck at any point of time in the course. It is very advised that no one should just copy the solutions(violation of Honor Code) presented here.
Currently transferring handwritten notes to digital form.
Check again, “Entity cannot reference Entity”, but there is connections?.
Do including POM file <classpathentry kind="lib" path="C:/Users/ScoopiDoo/Desktop/git projektit/spring-springboot-angular-microservices-mysql-java-persistence-hibernate-aws/Java Persistence Hibernate and JPA Fundamentals/Files for course/connector/mysql-connector-j-9.2.0/mysql-connector-j-9.2.0.jar"/>
In .classpath.
Remove numbers from packages .md if there is.
When course finished, remove the projects from the IDE!
If the content sparked 🔥 your interest, please consider buying the course and start learning 📖.
cert here.
Note: The material provided in this repository is only for helping those who may get stuck at any point of time in the course. It is very advised that no one should just copy the solutions(violation of Honor Code) presented here.
If the content sparked 🔥 your interest, please consider buying the course and start learning 📖.
Insert certificate here when completed
Note: The material provided in this repository is only for helping those who may get stuck at any point of time in the course. It is very advised that no one should just copy the solutions(violation of Honor Code) presented here.
This repository is made with with Eclipse hotkeys. This is why it will include configuration files which are related to this IDE this approach, and it will be favored for now, also the compiled classed for explanatory experiments. ⚙️
If the content sparked 🔥 your interest, please consider buying the course and start learning 📖.
Insert certificate here when completed
Note: The material provided in this repository is only for helping those who may get stuck at any point of time in the course. It is very advised that no one should just copy the solutions(violation of Honor Code) presented here.
If the content sparked 🔥 your interest, please consider buying the course and start learning 📖
Insert certificate here when completed
Note: The material provided in this repository is only for helping those who may get stuck at any point of time in the course. It is very advised that no one should just copy the solutions(violation of Honor Code) presented here.
If the content sparked 🔥 your interest, please consider buying the course and start learning 📖.
Insert certificate here when completed
Note: The material provided in this repository is only for helping those who may get stuck at any point of time in the course. It is very advised that no one should just copy the solutions(violation of Honor Code) presented here.
Progress/Curriculum.
Section 01 – Section 1: NEW – Spring Boot 3 Quick Start.
Contains my own notes with some course material to enforce learning experience.
This repository is made with with Eclipse hotkeys, therefore it will include configuration files which are related to this IDE this approach will be favored for now. ⚙️
If the content sparked 🔥 your interest, please consider buying the course and start learning 📖.
Note: The material provided in this repository is only for helping those who may get stuck at any point of time in the course. It is very advised that no one should just copy the solutions(violation of Honor Code) presented here.
If the content sparked 🔥 your interest, please consider buying the course and start learning 📖.
Insert certificate here when completed
Note: The material provided in this repository is only for helping those who may get stuck at any point of time in the course. It is very advised that no one should just copy the solutions(violation of Honor Code) presented here.
Currently transferring handwritten notes to digital form.
If the content sparked 🔥 your interest, please consider buying the course and start learning 📖.
Note: The material provided in this repository is only for helping those who may get stuck at any point of time in the course. It is very advised that no one should just copy the solutions(violation of Honor Code) presented here.
Currently transferring handwritten notes to digital form.
Check again, “Entity cannot reference Entity”, but there is connections?.
Do including POM file <classpathentry kind="lib" path="C:/Users/ScoopiDoo/Desktop/git projektit/spring-springboot-angular-microservices-mysql-java-persistence-hibernate-aws/Java Persistence Hibernate and JPA Fundamentals/Files for course/connector/mysql-connector-j-9.2.0/mysql-connector-j-9.2.0.jar"/>
In .classpath.
Remove numbers from packages .md if there is.
When course finished, remove the projects from the IDE!
If the content sparked 🔥 your interest, please consider buying the course and start learning 📖.
cert here.
Note: The material provided in this repository is only for helping those who may get stuck at any point of time in the course. It is very advised that no one should just copy the solutions(violation of Honor Code) presented here.
If the content sparked 🔥 your interest, please consider buying the course and start learning 📖.
Note: The material provided in this repository is only for helping those who may get stuck at any point of time in the course. It is very advised that no one should just copy the solutions(violation of Honor Code) presented here.
If the content sparked 🔥 your interest, please consider buying the course and start learning 📖.
Insert certificate here when completed
Note: The material provided in this repository is only for helping those who may get stuck at any point of time in the course. It is very advised that no one should just copy the solutions(violation of Honor Code) presented here.
If the content sparked 🔥 your interest, please consider buying the course and start learning 📖.
Insert certificate here when completed
Note: The material provided in this repository is only for helping those who may get stuck at any point of time in the course. It is very advised that no one should just copy the solutions(violation of Honor Code) presented here.
This repository is made with with Eclipse hotkeys. This is why it will include configuration files which are related to this IDE this approach, and it will be favored for now, also the compiled classed for explanatory experiments. ⚙️
If the content sparked 🔥 your interest, please consider buying the course and start learning 📖.
Insert certificate here when completed
Note: The material provided in this repository is only for helping those who may get stuck at any point of time in the course. It is very advised that no one should just copy the solutions(violation of Honor Code) presented here.
If the content sparked 🔥 your interest, please consider buying the course and start learning 📖
Insert certificate here when completed
Note: The material provided in this repository is only for helping those who may get stuck at any point of time in the course. It is very advised that no one should just copy the solutions(violation of Honor Code) presented here.
conu is a library which makes it easy to write tests for your containers
and is handy when playing with containers inside your code.
It defines an API to access and manipulate containers,
images and provides more, very helpful functions.
conu is supported on python 3.6+ only.
Installation
PyPI
conu is available on PyPI, so you can easily install it with pip:
$ pip install --user conu
Fedora
If you are running Fedora, we have packaged conu in an RPM:
kill, get logs, exec a command, mount, remove, start, stop, wait, run – via api or via binary
get low-level container metadata
shortcut methods for getting:
IPv4 and IPv6 addresses
PID of root process in the container
port mappings
container status
HTTP requests support
open a TCP connection with the service inside container
perform checks whether
the container is running
mapped ports are opened
Utilities
easily create and delete a directory and set its options:
mode
ownership
selinux context
access control lists (facl)
port availability check
check SELinux status on host
run a command on host
easy random string generation
support for probes (execute a function in a separate process):
repeat until a condition is met
repeat N times
delay execution
delay between iterations
Kubernetes
create/delete new namespace
create/delete Pod
create/delete Deployment
with parameters
from template
create/delete Service
shortcut methods for getting:
pod logs
pod IP
pod phase
pod condition
service IP
perform checks whether
pod is ready
all pods are ready for specific deployment
OpenShift
create new app using oc new-app command
deploy pure image into openshift
support building s2i images from remote repository
support building s2i images from local path
support creating new applications using OpenShift templates
push images to internal OpenShift registry
request service
waiting until service is ready
obtain logs from all pods
get status of application
check readiness of pods
cleanup objects of specific application in current namespace
Docker example
Let’s look at a practical example:
$ cat examples/readme_webserver.py
#!/usr/bin/python3importloggingfromconuimportDockerRunBuilder, DockerBackend# our webserver will be accessible on this portport=8765# we'll utilize this container imageimage_name="registry.fedoraproject.org/fedora"image_tag="27"# we'll run our container using docker enginewithDockerBackend(logging_level=logging.DEBUG) asbackend:
# the image will be pulled if it's not presentimage=backend.ImageClass(image_name, tag=image_tag)
# the command to run in a containercommand= ["python3", "-m", "http.server", "--bind", "0.0.0.0", "%d"%port]
# let's run the container (in the background)container=image.run_via_binary(command=command)
try:
# we need to wait for the webserver to start servingcontainer.wait_for_port(port)
# GET on /# this is standard `requests.Response`http_response=container.http_request(path="https://github.com/", port=port)
asserthttp_response.okassert'<a href="https://github.com/user-cont/etc/">etc/</a>'inhttp_response.content.decode("utf-8")
# let's access /etc/passwdetc_passwd=container.http_request(path="/etc/passwd", port=port).content.decode("utf-8")
assert'root:x:0:0:root:/root:'inetc_passwd# we can also access it directly on disk and comparewithcontainer.mount() asfs:
assertetc_passwd==fs.read_file("/etc/passwd")
finally:
container.kill()
container.delete()
Let’s run it and look at the logs:
$ python3 examples/readme_webserver.py
13:32:17.668 backend.py        INFO   conu has initiated, welcome to the party!
13:32:17.668 backend.py        DEBUG  conu version: 0.1.0
13:32:17.669 filesystem.py     INFO   initializing Directory(path=/tmp/shiny-kbjmsxgett)
13:32:17.669 filesystem.py     DEBUG  changing permission bits of /tmp/shiny-kbjmsxgett to 0o700
13:32:17.669 filesystem.py     INFO   initialized
13:32:17.676 image.py          INFO   run container via binary in background
13:32:17.676 image.py          DEBUG  docker command: ['docker', 'container', 'run', '-v', '/tmp/shiny-kbjmsxgett:/webroot', '-w', '/webroot', '-d', '--cidfile=/tmp/conu-b3jluxsc/conu-cbtbokqsedrtmiktfawbozgczdgxktmt', '-l', 'conu.test_artifact', 'sha256:9881e4229c9517b592980740ab2dfd8b5176adf7eb3be0f32b10a5dac5a3f12a', 'python3', '-m', 'http.server', '--bind', '0.0.0.0', '8765']
13:32:17.676 __init__.py       DEBUG  command: ['docker', 'container', 'run', '-v', '/tmp/shiny-kbjmsxgett:/webroot', '-w', '/webroot', '-d', '--cidfile=/tmp/conu-b3jluxsc/conu-cbtbokqsedrtmiktfawbozgczdgxktmt', '-l', 'conu.test_artifact', 'sha256:9881e4229c9517b592980740ab2dfd8b5176adf7eb3be0f32b10a5dac5a3f12a', 'python3', '-m', 'http.server', '--bind', '0.0.0.0', '8765']
6a0530ab32c17858180c9c3867c17a2aaf3466c6dd17c329ab7a0cf9d991f626
13:32:18.131 probes.py         DEBUG  starting probe
13:32:18.137 probes.py         DEBUG  Running "<lambda>" with parameters: "{}": 0/10
13:32:18.133 probes.py         DEBUG  first process started: pid=5812
13:32:18.141 probes.py         DEBUG  pausing for 0.1 before next try
13:32:18.243 probes.py         DEBUG  starting probe
13:32:18.244 probes.py         DEBUG  first process started: pid=5828
13:32:18.245 probes.py         DEBUG  pausing for 1 before next try
13:32:18.246 probes.py         DEBUG  Running "functools.partial(<bound method DockerContainer.is_port_open of DockerContainer(image=registry.fedoraproject.org/fedora:27, id=6a0530ab32c17858180c9c3867c17a2aaf3466c6dd17c329ab7a0cf9d991f626)>, 8765)" with parameters: "{}":      0/10
13:32:18.251 __init__.py       INFO   trying to open connection to 172.17.0.2:8765
13:32:18.251 __init__.py       INFO   was connection successful? errno: 0
13:32:18.251 __init__.py       DEBUG  port is opened: 172.17.0.2:8765
13:32:19.444 filesystem.py     INFO   brace yourselves, removing '/tmp/shiny-kbjmsxgett'
The test passed! The logs should be easy to read, so you should have pretty good overview of what happened.
Kubernetes
Use conu with minikube locally
If you want to test your images in Kubernetes locally, you will need to run kubernetes cluster on your host. We recommend to use minikube, for installation follow instructions in minikube github repository.
After that, run minikube like this:
$ minikube start
Kubernetes example
$ cat examples/k8s_deployment.py
fromconu.backend.k8s.backendimportK8sBackendfromconu.backend.k8s.deploymentimportDeploymentfromconu.utilsimportget_oc_api_token# obtain API key from OpenShift cluster. If you are not using OpenShift cluster for kubernetes tests# you need to replace `get_oc_api_token()` with your Bearer token. More information here:# https://kubernetes.io/docs/reference/access-authn-authz/authentication/api_key=get_oc_api_token()
withK8sBackend(api_key=api_key) ask8s_backend:
namespace=k8s_backend.create_namespace()
template=""" apiVersion: apps/v1 kind: Deployment metadata: name: hello-world labels: app: hello-world spec: replicas: 3 selector: matchLabels: app: hello-world template: metadata: labels: app: hello-world spec: containers: - name: hello-openshift image: openshift/hello-openshift """test_deployment=Deployment(namespace=namespace, from_template=template,
create_in_cluster=True)
try:
test_deployment.wait(200)
asserttest_deployment.all_pods_ready()
finally:
test_deployment.delete()
k8s_backend.delete_namespace(namespace)
Let’s run it and look at the logs:
$ python3 examples/k8s_deployment.py
13:23:09.479 backend.py        INFO   conu has initiated, welcome to the party!
13:23:09.523 backend.py        INFO   Creating namespace: namespace-m4cz
13:23:14.557 backend.py        INFO   Namespace is ready!
13:23:19.562 deployment.py     INFO   Creating Deployment hello-world in namespace: namespace-m4cz
13:23:27.625 deployment.py     INFO   All pods are ready for deployment hello-world in namespace: namespace-m4cz
13:23:28.620 deployment.py     INFO   Deleting Deployment hello-world in namespace: namespace-m4cz
13:23:28.654 backend.py        INFO   Deleting namespace: namespace-m4cz
Openshift
Use conu for testing locally
If you want to test your images in OpenShift locally, you need to run OpenShift cluster on your host. You can install it by following instructions in OpenShift origin or minishift github repositories.
After that, you may need to setup cluster, here is example setup:
For more information, why do you need to grant all these rights to user see accessing registry
OpenShift example
$ cat examples/oepnshift/openshift_s2i_remote.py
importloggingfromconu.backend.origin.backendimportOpenshiftBackendfromconu.backend.docker.backendimportDockerBackendfromconu.utilsimportget_oc_api_tokenapi_key=get_oc_api_token()
withOpenshiftBackend(api_key=api_key, logging_level=logging.DEBUG) asopenshift_backend:
withDockerBackend(logging_level=logging.DEBUG) asbackend:
# builder imagepython_image=backend.ImageClass("centos/python-36-centos7")
# docker login inside OpenShift internal registryOpenshiftBackend.login_to_registry('developer')
# create new app from remote source in OpenShift clusterapp_name=openshift_backend.new_app(python_image,
source="https://github.com/openshift/django-ex.git",
project='myproject')
try:
# wait until service is ready to accept requestsopenshift_backend.wait_for_service(
app_name=app_name,
expected_output='Welcome to your Django application on OpenShift',
timeout=300)
finally:
openshift_backend.clean_project(app_name)
13:29:38.231 backend.py        INFO   conu has initiated, welcome to the party!
13:29:38.231 backend.py        DEBUG  conu version: 0.5.0
13:29:38.256 backend.py        INFO   conu has initiated, welcome to the party!
13:29:38.256 backend.py        DEBUG  conu version: 0.5.0
13:29:38.314 __init__.py       INFO   docker environment info: 'Client:\n Version:         1.13.1\n API version:     1.26\n Package version: docker-1.13.1-74.git6e3bb8e.el7.centos.x86_64\n Go version:      go1.10.3\n Git commit:      1556cce-unsupported\n Built:           Wed Aug  1 17:21:17 2018\n OS/Arch:         linux/amd64\n\nServer:\n Version:         1.13.1\n API version:     1.26 (minimum version 1.12)\n Package version: docker-1.13.1-74.git6e3bb8e.el7.centos.x86_64\n Go version:      go1.9.4\n Git commit:      6e3bb8e/1.13.1\n Built:           Tue Aug 21 15:23:37 2018\n OS/Arch:         linux/amd64\n Experimental:    false\n'
13:29:38.326 backend.py        INFO   conu has initiated, welcome to the party!
13:29:38.584 backend.py        INFO   conu has initiated, welcome to the party!
13:29:38.656 backend.py        INFO   Login to 172.30.1.1:5000 succeed
13:29:38.656 backend.py        INFO   conu has initiated, welcome to the party!
13:29:38.673 image.py          INFO   The push refers to a repository [172.30.1.1:5000/myproject/python-36-centos7]
13:29:38.689 image.py          INFO   Preparing
13:29:38.689 image.py          INFO   Preparing
13:29:38.689 image.py          INFO   Preparing
13:29:38.690 image.py          INFO   Preparing
13:29:38.690 image.py          INFO   Preparing
13:29:38.690 image.py          INFO   Preparing
13:29:38.690 image.py          INFO   Preparing
13:29:38.690 image.py          INFO   Preparing
13:29:38.690 image.py          INFO   Preparing
13:29:38.700 image.py          INFO   Waiting
13:29:38.701 image.py          INFO   Waiting
13:29:38.701 image.py          INFO   Waiting
13:29:38.701 image.py          INFO   Waiting
13:29:38.747 image.py          INFO   Layer already exists
13:29:38.747 image.py          INFO   Layer already exists
13:29:38.753 image.py          INFO   Layer already exists
13:29:38.754 image.py          INFO   Layer already exists
13:29:38.772 image.py          INFO   Layer already exists
13:29:38.807 image.py          INFO   Layer already exists
13:29:38.807 image.py          INFO   Layer already exists
13:29:38.807 image.py          INFO   Layer already exists
13:29:38.807 image.py          INFO   Layer already exists
13:29:39.065 image.py          INFO   latest: digest: sha256:51cf14c1d1491c5ab0e902c52740c22d4fff52f95111b97d195d12325a426350 size: 2210
13:29:39.065 backend.py        INFO   Creating new app in project myproject
13:29:39.558 backend.py        INFO   Waiting for service to get ready
13:30:06.768 backend.py        INFO   Connection to service established and return expected output!
13:30:07.729 backend.py        INFO   Deleting app
13:30:09.504 backend.py        INFO   deploymentconfig "app-u4ow" deleted
13:30:09.504 backend.py        INFO   buildconfig "app-u4ow" deleted
13:30:09.504 backend.py        INFO   imagestream "app-u4ow" deleted
13:30:09.504 backend.py        INFO   pod "app-u4ow-1-vltwq" deleted
13:30:09.504 backend.py        INFO   service "app-u4ow" deleted


 https://github.com/scru128/c